
The Email Addresses list is the foundation of PhishProtection's sender impersonation detection feature. When an inbound email's display name matches a name in your employee list but arrives from an unrecognized email address, PhishProtection injects a warning banner into the message to alert the recipient of a possible impersonation attempt.
To access the Email Addresses list, log into the DuoCircle portal and open the PhishProtection settings for the domain. Then select Settings → Email Addresses from the top navigation menu.
Adding a Single Employee Manually
To add one employee at a time, click the blue + button in the upper-right area of the Email Addresses page. The Add Employee dialog will appear.
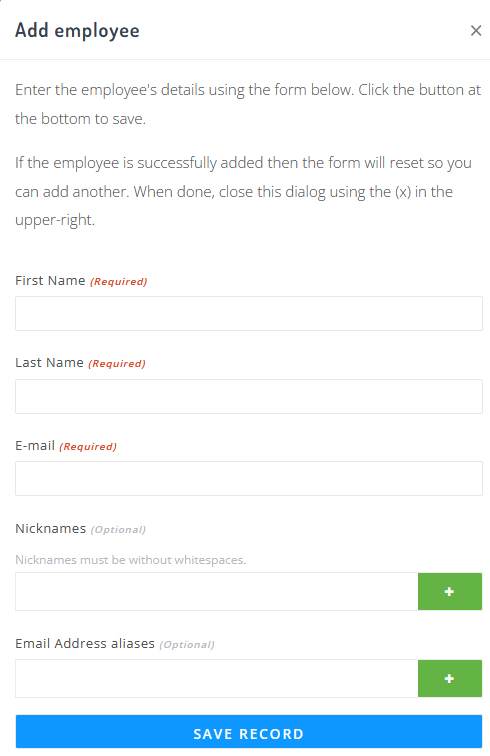
Fill in the following fields:
- First Name (Required) — The employee's first name as it would appear in email display names.
- Last Name (Required) — The employee's last name.
- E-mail (Required) — The employee's primary email address. This must be on your organization's configured email domain.
- Nicknames (Optional) — Alternate names this employee is commonly known by. Each nickname must be a single word with no spaces (for example: Bob, Liz, JD). Click the green + button to add each nickname individually. Nicknames are included in impersonation matching — if an inbound email uses a nickname as the sender display name, PhishProtection will still recognize it as a potential impersonation attempt.
- Email Address aliases (Optional) — Additional email addresses belonging to this employee (for example, a secondary mailbox or a personal mailbox outside the corporate domain which the user sends mail from that needs recognition). Click the green + button to add each address individually. Aliases are recognized as legitimate sending addresses for this employee and will not trigger an impersonation warning.
When you have filled in the fields, click Save Record. If the record is saved successfully, the form will reset so you can add another employee. When you are finished, close the dialog using the × in the upper-right corner.
Other Methods for Adding Employees
For organizations with a large number of employees, adding records one at a time may not be practical. Two additional options are available from the Email Addresses page:
- CSV Import — Upload a spreadsheet file containing your employee list in bulk. Click the upload button (blue arrow icon) to get started.
- Microsoft 365 Sync — Import your employee directory directly from Microsoft 365. Click the Windows icon button to authorize and configure the sync. Auto-sync can be enabled to keep the list updated automatically as your directory changes.